Once you’ve gathered the essential supplies for hand embroidery, stitched a few projects, and determined this might be the craft for you, you may find yourself collecting more “optional” supplies. Optional supplies are those that you might find helpful or fun, even if they don’t always feel super necessary. That said, many of these supplies make certain aspects of stitching easier and more physically accessible!
In this post, I’ve outlined just a few of the optional supplies for hand embroidery I’ve found to be particularly helpful. This is not an exhaustive list by any means, and I plan to update this post in the future with additional supplies you might consider as you continue stitching. You’ll find I’ve included links to relevant posts (if I’ve talked about a particular supply in more detail elsewhere), products in my own shop (if I happen to sell them), and products sold by others (none of which are affiliate links; they’re just meant to be helpful to you!).
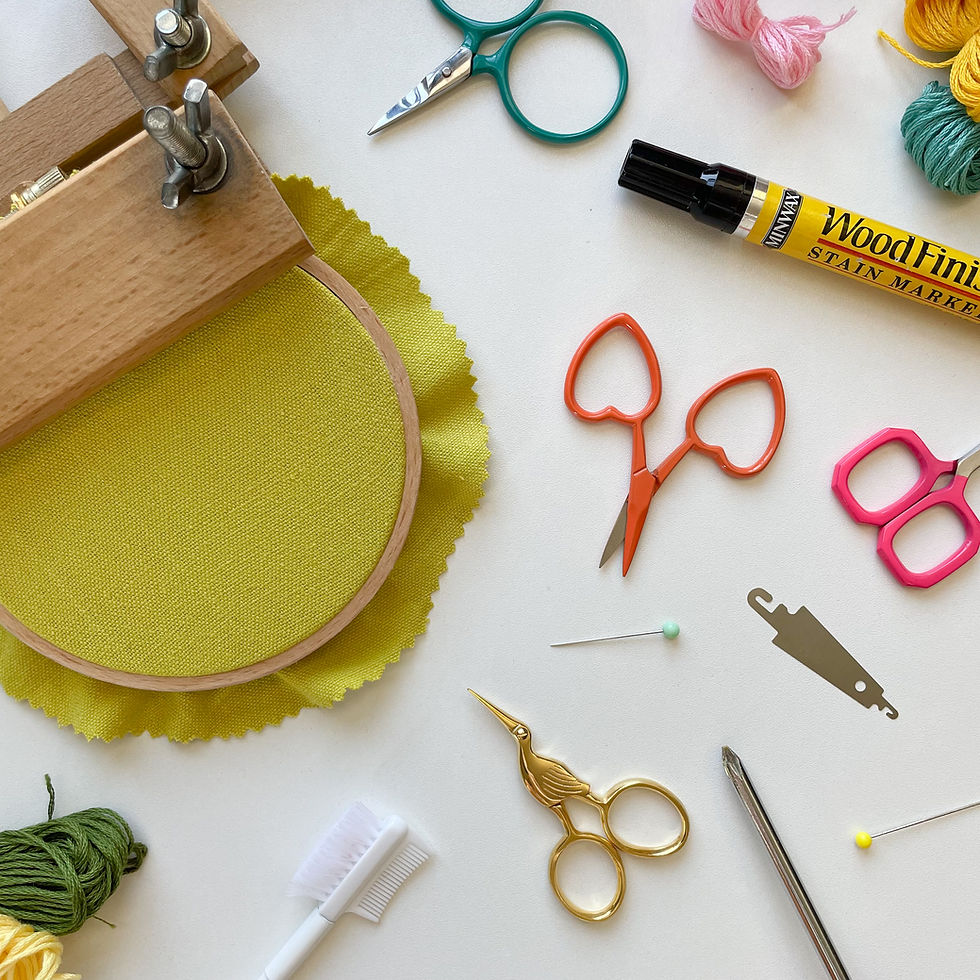
Embroidery Stands
I’m putting embroidery stands at the top of this post because it’s one of the most frequently asked questions I get: Where did you get the stand in your videos? The stand you see in most of my video tutorials is the Sonata Seat Stand, which I purchased from Hawthorn Handmade in the UK. This was one of the first “non-essential” supplies I bought for myself, thinking it would help me to stitch more quickly.
I love this stand for certain stitches, such as French knots and satin stitch; at the same time, stitches that are easier to do when you can more easily maneuver the hoop, such as woven wheel roses and thistle flowers, are easier for me to do outside of the stand. Most often, I use the stand to keep my hoop steady for video tutorials, such as the tutorials I create for my monthly subscription box.
I love this stand; it’s easy to put together, can fit multiple different sizes of embroidery hoops, and has various articulating parts that allow me to easily adjust it to my needs. You can sit on it as intended, or even attach it to a surface using something heavy (like books) or a clamp.
That said, there are loads of different stands on the market! You’ll want to do a bit of research to determine what might work best for you given the projects you like to stitch and how you like to stitch them. Unfortunately, they do tend to be on the pricier side in terms of embroidery supplies, and the best way to know if it will work for you is to use your best judgment, choose a stand, and give it a try. I was very lucky to have found a stand that works for me on the first try - I hope you get just as lucky!
Embroidery Scissors
You don’t need fancy scissors to do embroidery, so why get them at all? Embroidery scissors tend to be smaller than the average pair of scissors you can get in the school supply section of a big box store, and to have a sharper point; these attributes, i.e., size and sharpness, allow you to more easily and precisely snip off the ends of your floss.
My first pair of embroidery scissors were a gift from a regular at the coffee shop I worked at years ago, when I first started stitching as a hobby. Such a thoughtful gift, and one I didn’t realize I wanted or needed until I had my first pair!
These days, I include scissors in subscribers’ Hopebroidery Boxes, curating the specific pair to that month’s specific project and design. I also sell embroidery scissors in my shop, so you can choose exactly which pair you’d like to work with - even if you don’t end up being a collector, like me! You can find embroidery scissors in most craft stores, in loads of different online shops, and even in the beauty section of many department stores (like this pair, from Target!).
Needle Threaders
I nearly quit embroidery before I started because I couldn’t manage to thread a needle! Depending on the thickness of the strand of floss you’re threading, and the size of the eye of your needle, you might find this to be fairly difficult as well (especially if you have a natural shake to your hands, like me!).
Needle threaders make threading a needle so much easier, are incredibly easy to find in craft stores and online, and are a pretty cheap optional tool for you to add to your supply bag.
Screwdrivers and Pliers
If your embroidery hoop’s hardware has notches, you can use a screwdriver to help get it as tight as possible. If it doesn’t have notches, you can use pliers for the same purpose. I demonstrate using a screwdriver to get my hoop nice and tight in another post!
Transfer Methods
For many fabrics and embroidery patterns, a simple pencil will do the trick for transferring your designs to your hoop. If, however, you’d prefer to be able to erase your transfer marks once you’ve finished stitching, you do have loads of different options available to you. I outline a few of those options in a general blog post about transfer methods, and have more detailed instructions available for how to use white water-erasable transfer pens and washable transfer paper on the blog.
The transfer method you choose will depend on the design that you're stitching, the fabric you’ve chosen for your project, and various personal preferences you’ll naturally develop as you practice and grow your skills.
In general, I recommend “choosing as you go,” meaning, finding a good transfer method for whatever project you happen to be working on at the moment (rather than trying to learn all about all the different transfer methods, all at once). Over time, you’ll develop preferences, allowing you to better anticipate which transfer methods work best for you, and when.
Wood Stain and Paint
If you’re planning to frame your finished project in the hoop itself, you may find yourself wishing the hoop were a different color to better match your project. To do this, you can use wood stain or paint to get your hoop to your desired color and shade. When I stain and paint my hoops, I typically only use one or two layers, and rarely sand or seal during the process; you might find that you prefer the look of a sanded and sealed hoop. Again, everybody develops their own preferences over time!
Additional optional supplies for hand embroidery
The supplies discussed in this post are truly just the tip of the iceberg. Other optional supplies you might eventually use include seam rippers (to remove stitches from your project), tweezers (to help remove small bits of floss, hair, or lint), tape (to help secure a pattern to the back of your hoop when using the "window method" to transfer a design), and an endless array of options for storing and organizing the supplies themselves.
Feeling overwhelmed?
The optional supplies available to you as an embroidery artist might feel overwhelming, so keep in mind that you really only need a few essential supplies to get started! Again, I recommend adding on new supplies on an as-needed (or as-wanted, really!) basis.
I hope this was useful, and I can't wait to see what you make! If you'd like to share your work with me, you can always tag me on your social media accounts (@hopebroidery on Instagram and Twitter, @hope.broidery on TikTok). If you don't have public social accounts, but still want to share, consider emailing me a few pictures (hope@hopebroidery.com), I would love the chance to tell you how much I love your work!
Happy stitching!


Comments