Each month, I send subscribers to the Hopebroidery Box a pattern and full-length, step-by-step video tutorial for that month's project. Subscribers to the physical box also receive all the supplies you'll need for your project, including full skeins of Sublime Stitching embroidery floss, a large cut of that month's fabric, embroidery scissors from Kelmscott Designs curated specifically for that month's project, and more. You can take a look at past boxes by visiting the kits and digital patterns sections of my shop (I keep the sold out physical kits viewable in the shop just in case you want to see what sorts of supplies and designs have come in past boxes, even if they're no longer available).
For the past year or so, I've been writing about how I design each month's project in hopes that it might be helpful to see the different ways I go about designing these sample hoops. Specifically, I hope it's helpful to you (if you're a newer designer looking for examples of how this process might work), and also find that it's been helpful to me (taking the time to process how each project comes to life is informative to my future work!).
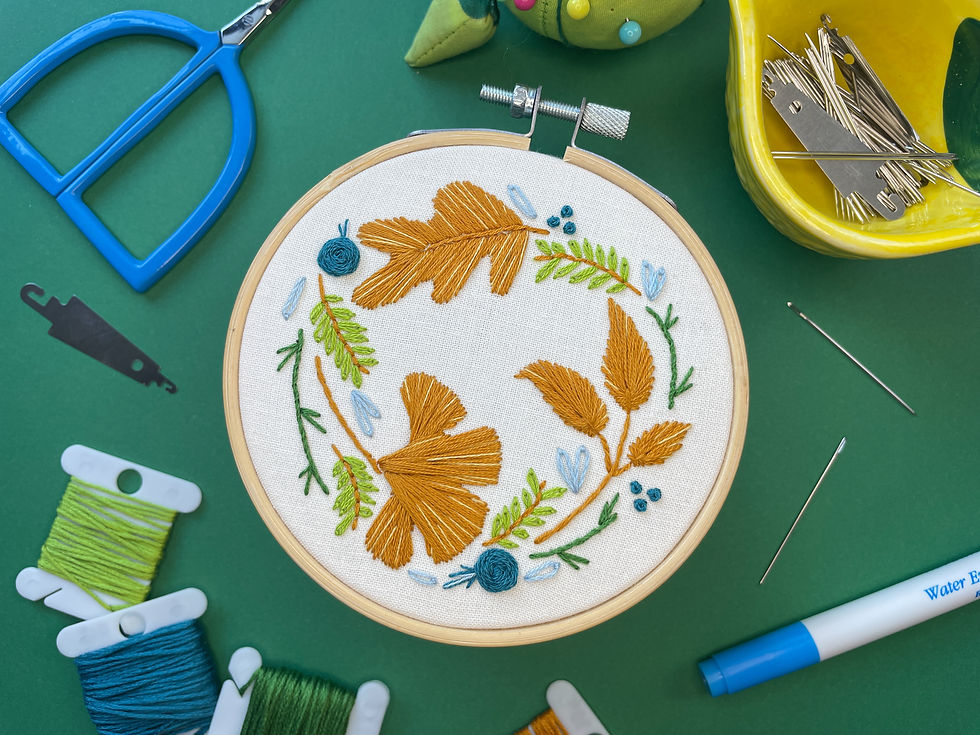
In this post, I share the process of creating the early fall leaves sample hoop for the September 2022 box, a project featuring three early fall leaves stitched onto off-white fabric and surrounded by pine needles, green vines, and flowers and embellishments in shades of blue.
Designing the early fall leaves embroidery project and pattern
I love stitching and sketching leaves; in fact, one of my very first video tutorials (posted on Instagram) was an overhead shot of me using fishbone stitch to create a simple leaf! But although I often incorporate smaller leaves into box projects, and have a few simple leaf-centric digital patterns available in the shop, I haven't designed a leaf-centric box project since the September 2019 box! And so this month seemed like a great excuse to bring back leafy projects -- starting with a sketch, of course! In the short timelapse video below, you'll notice I started by sketching out a few of my favorite types of leaf shapes, which I used to help create the final composition.
(If you're interested in how I use the Procreate app to turn my finished embroidery designs into patterns, check out this YouTube tutorial I published in 2020!)
Choosing colors, preparing to take pattern notes, and transferring the early fall leaves design to fabric
After finalizing the pattern, it was time for me to choose fabric and a handful of Sublime Stitching embroidery floss colors to work with as I stitched. I chose an off-white cotton fabric from Kona, and floss in shades of yellows, blues, and greens. I like to choose more colors than what I'll end up using in the pattern itself, to allow myself a few options as I stitch; and, as you can see below, sometimes that means pulling two colors that look pretty similar -- at this stage, I just can't be sure which colors will work best!

As always, I prepared my pattern notebook to take detailed notes as I stitched the sample, and you can see the blank spread for this month's project in the photo below. I find this practice of meticulous note taking helps me to create better, more accurate embroidery patterns. It also helps me to write more patterns, in general -- even if they're not for the box!

Next, I transferred my design using a blue water-erasable transfer pen and the window method. Each box's transfer method varies depending on what works best. Some months, we use a pencil; others, we might use blue water-erasable pens (like what we'll be using for this box) or white water-erasable pens; and at times I'll include the pattern pre-printed onto washable transfer paper. Each month's transfer method depends on what works best for that month's particular project!

Stitching the early fall leaves project
Designing, choosing colors for, and transferring this month's pattern was a breeze. The stitching, however, took me a while -- and I'm not totally sure why! Was it because I had been slacking on my daily stitching habit (easy to do when stitching still feels less like work than fun)? Maybe the early fall aesthetic put me into a sour mood (I'm more of a spring and summer lover, and I'm not looking forward to the days getting shorter in the coming months). Who knows! Maybe some projects just happen to take longer than others -- and that's okay!
In my first attempt, pictured below, you'll see I played around with filling my leaves in with open fill techniques. The stitch you see here is a modified version of cloud filling stitch, which I think could have worked out just great -- until I remembered last month's box project had been open-fill-heavy (if you missed August's fruit sampler box, you'll find extras in my shop). Two boxes with such similar techniques in a row doesn't work for me; I get bored if the techniques and themes don't vary throughout the year (and I'm sure subscribers might say the same thing).

I re-started, filling in the leaf completely, and solidified a decision regarding the base colors for the remaining leaves.

For the second leaf (rather, the second set of leaves), I used a stitch I haven't used in quite some time -- raised herringbone. What a fun way to fill in these sorts of shapes!

Filling in this gingko leave was also so much fun -- I've been wanting to incorporate this shape into a project for a little over a year now, and I'm so glad I was finally able to figure out a composition that might do it some justice!

Once my base leaves were finished I was ready to start incorporating in other colors, starting with a deep blue color I used for a few roses and French knot embellishments.

Next, I began incorporating a light green color into the project. With a third color on the hoop, the rest of the process went by fairly quickly. If you've stitched with me via other box projects or kits, you've probably noticed me saying something to the effect of, "now that the hard parts are out of the way, the rest is going to go by super quickly!" That was definitely the case with this project, too!

I added introduced two more colors at this point: a darker shade of green for vines, and a pale yellow for highlights on the leaves.

I added in just one more color at this point, a very light blue -- and did my very best to hold back in terms of adding in additional embellishments. The poorly lit photo below was taken just after finishing, late into the night!

By the time I was ready to take photos of the final project, the scissors for September's box had already arrived; I think they go quite nicely with the final sample hoop!

Although this project took me longer than usual to finish, I'm so glad I didn't rush through the process; I absolutely love the final result!
It's not all about designing and stitching, though!
As I'm working through the sample project, I'm also doing other things for the box, including choosing and ordering that month's scissors (you'll find other blue embroidery scissors from past boxes in my shop, too!); purchasing, cutting, and folding that month's fabric; bundling full skeins of Sublime Stitching embroidery floss; and loads of other steps that eventually come together into neatly packaged embroidery kits.
The process of putting together your box projects, kits, and patterns each month works a bit like a puzzle for me, and I absolutely love it! That said, the best part is creating something that you might want to recreate with me; I absolutely love seeing what subscribers make each month, either on social media or sent directly to me via email -- it's such a treat!
Interested in stitching this early fall leaves project with me?
Subscriptions for the September 2022 Hopebroidery Box will be open throughout the month of August, and subscribers' boxes are set to be shipped (and patterns sent to your emails) the first week of September. I know subscriptions can be super confusing at times, so please feel free to reach out to me directly via email should you have any questions whatsoever before subscribing!
Thank you for being here, and happy stitching!
Thank you so much for being here! I truly appreciate you, whether you're here to shop or simply here to learn! If you're interested in embroidery kits, but don't think mine are the right fit for you, check out my post all about how to choose an embroidery kit -- I want to help you find the right fit for you, even if it's not with me!
Happy stitching, happy end of summer and early fall, and I'll see you next month for another box design process post!






Comentários